This article is part of the Twilio Conversations API series
In this article, you will learn how to build a React app to display text messages sent from a phone using Twilio Conversations. At this point, you should have a Conversation setup with two Participants and a webhook endpoint configured in your Twilio console. Check out the first article in this series if you don’t have all of that setup.
Once you are ready, we will run through these steps in this article
- Create the React app
- Install Tailwind
- Setup socket.io on your Node server
- Push messages received on your server to your React app
- Add a React component to listen for the messages
- Setup socket.io-client in your React app
- Create React components to display messages
- Activate webhook events in your Twilio Console
Overview
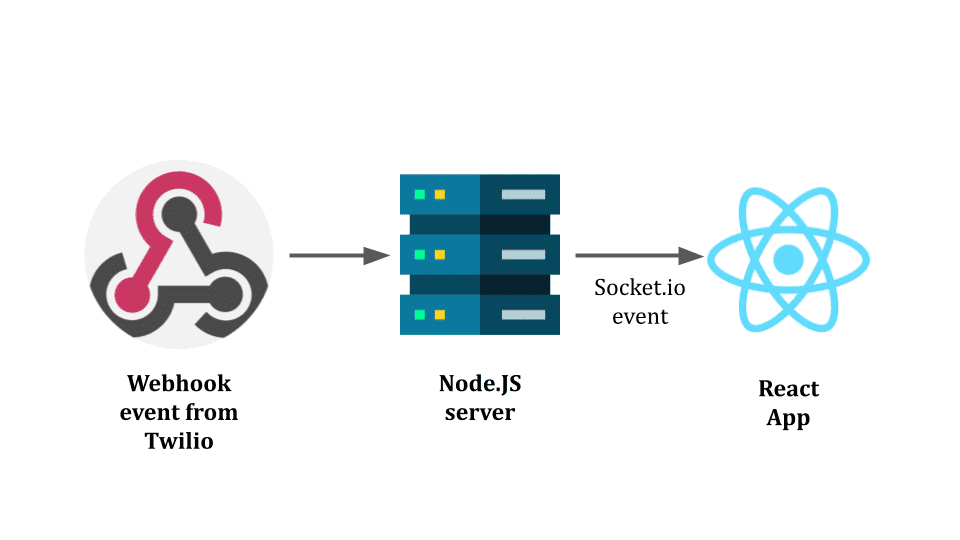
Here’s a high level diagram of the architecture of our app. You will have a Node.js server and a React client app. The Node.js server is already set up from the last article. You will simply be installing a library called socket.io to push the webhook events sent by Twilio from your server to your React app, which you will create in this article. Your React app will in turn consume the events from the server using socket.io and display them on screen
Create the React app
Start by creating the boilerplate code for your
npx create-react-app conversations-demo-appInstall Tailwind CSS
We will be using Tailwind CSS to style our app. Follow the Tailwind CSS installation instructions to get it setup with React
npx create-react-app conversations-demo-appSetup your Node.js server and create your webhook endpoint
Once created, you will be moving the Node.js server code created in the previous article into this newly created directory structure.
Before doing that, install the necessary server side packages. We’re installing Babel so that we can use modern ES6 syntax.
npm i express body-parser http concurrently @babel/core @babel/node @babel/preset-envNext, create a subdirectory called “server”. Then, create a file within that directory called server.js. This subdirectory will contain server side code you created in the last article.
const express = require("express");
const bodyParser = require("body-parser");
const http = require("http");
const app = express();
let port = process.env.PORT || 3001;

const server = http.createServer(app);

app.use(bodyParser.json());

app.use(bodyParser.urlencoded({ extended: true }));

app.post("/api/conversations/webhook", (req, res) => {
  console.log(req.body);
});

server.listen(port, () => console.log(`Listening on port ${port}`));
At this point, your directory tree should look like this
conversations-demo-app/
├── package.json
├── server
│   ├── server.js
├── node_modules
└── src
    ├── App.css
    ├── App.js
    ├── App.test.js
    ├── index.css
    ├── index.js
    ├── logo.svg
    ├── reportWebVitals.js
    ├── setupProxy.js
    └── setupTests.js
Update package.json to start both your React client app and your server. Simply replace the scripts section with the snippet below.
"scripts": {
  "start": "npm run development",
  "development": "NODE_ENV=development concurrently --kill-others \"npm run client\" \"npm run server\"",
  "production": "npm run build && NODE_ENV=production npm run server",
  "client": "craco start",
  "server": "nodemon -r dotenv/config --exec babel-node server/server.js",
  "build": "craco build",
  "test": "craco test",
  "eject": "react-scripts eject"
},
Finally, create .babelrc at the root of the project add add the directive to use Babel
{
  "presets": ["@babel/preset-env"]
}
Setup socket.io on your Node.js server
Next, install the socket.io client side and server side libraries.
Socket.io is a library for enabling real-time event based communication between client and server. It has a client side library that can run in React and a server side library that will run on your Node.js server. Installing the server side library lets you push the messages received on your Node.js webhook endpoint to your React app. Installing the client side library in your React app will enable you to receive those messages and then display them.
From within the root folder of conversations-demo-app, install the socket.io client side and server side libraries.
npm install socket.io-client socket.ioFirst, let’s get this setup on the server side. In server/server.js, import the socket.io library
import { Server } from "socket.io";Then, initialize it so that you can start listening for connections from the client. This tells the socket.io server to accept client connections from any IP address
const io = new Server(server, {
  cors: {
    origin: "*",
  },
});
Finally, initialize the socket.io listener so that it can accept client connections
io.on("connection", (socket) => {
  console.log("A client connected");
});
After these additions, server.js should look like this.
import { Server } from "socket.io";
import express from "express";
import bodyParser from "body-parser";
import http from "http";

const app = express();
let port = process.env.PORT || 3001;
const server = http.createServer(app);
const io = new Server(server, {
  cors: {
    origin: "*",
  },
});

io.on("connection", (socket) => {
  console.log("A client connected");
});

app.use(bodyParser.json());
app.use(bodyParser.urlencoded({ extended: true }));

app.post("/api/conversations/webhook", (req, res) => {
  console.log(req.body);
  io.emit("event", req.body);
});

server.listen(port, () => console.log(`Listening on port ${port}`));
Push messages received on your server to the React app
Once Twilio sends your Node.js server a webhook with the message payload, you will need to push it to your React app. From within your webhook endpoint, you can do this by emitting an event with the webhook payload using the socket.io library
app.post("/api/conversations/webhook", async (req, res) => {
  console.log(req.body);
  io.emit("event", req.body);
});
With this code, every time a webhook is received from Twilio, it will be pushed out to connected clients. You will need to connect your React app to this server in the next step.
Setup socket.io-client and in your React app
For your React app, you will need to create a component that connects to your Node.js server that is accepting socket.io connections. Before you can do that, configure your React app to proxy requests to the Node.JS server that will be running on your local machine. Make sure to install the latest version.
npm i http-proxy-middleware@latestCreate a new file called src/setupProxy.js to instruct your React app to proxy requests to your Node.js server running on port 3001
const { createProxyMiddleware } = require("http-proxy-middleware");

module.exports = function (app) {
  app.use(
    "/api",
    createProxyMiddleware({
      target: "http://localhost:3001",
    })
  );
};
At this point, when you fire up your React app, all outgoing HTTP requests will be directed to your Node.js server.
Create React components to display messages
Create a the src/components subdirectory for organizing all of our React components
mkdir conversations-demo-app/src/componentsNext, create a component called Main and place it in the src/components subdirectory. This will be a parent component that will contain our component for displaying the webhook messages received from Twilio. In future articles, we will build on this component and extend this app further.
import React from "react";
import MessagesPane from "./MessagesPane";

const Main = () => {
  return (
    <div className="flex flex-row h-screen antialiased text-gray-800">
      <MessagesPane />
    </div>
  );
};

export default Main;
Once that’s done, create the MessagesPane child component and place it in the src/components subdirectory. This component will connect to the server, listen for events from your socket.io server, and display them on screen.
import React, { useEffect, useReducer } from "react";
import socketIOClient from "socket.io-client";

const reducer = (state, action) => {
  switch (action.type) {
    case "add_message":
      return {
        ...state,
        messages: [action.payload, ...state.messages],
      };
    default:
      return state;
  }
};

const initialState = {
  messages: [],
};

const MessagesPane = () => {
  const [state, dispatch] = useReducer(reducer, initialState);
  const { messages } = state;

  const initEvents = () => {
    const socket = socketIOClient("http://localhost:3001");
    socket.on("connect", () => {
      console.log("Socket connected");
    });

    socket.on("event", (event) => {
      console.log("event", event);
      dispatch({
        type: "add_message",
        payload: {
          sid: event.MessageSid,
          author: event.Author,
          body: event.Body,
        },
      });
    });
  };

  useEffect(() => {
    initEvents();
  }, []);

  const displayMessages = () => {
    if (messages.length > 0) {
      return messages.map((message) => (
        <div className="col-start-6 col-end-13 p-3 rounded-lg">
          <div className="flex flex-row-reverse items-center">
            <div className="flex items-center justify-center h-10 w-10 rounded-full bg-indigo-500 flex-shrink-0">
              {message.author}
            </div>
            <div className="relative ml-3 text-sm bg-white py-2 px-4 shadow rounded-xl">
              <div>{message.body}</div>
            </div>
          </div>
        </div>
      ));
    } else {
      return <p>No messages</p>;
    }
  };

  return (
    <div className="flex flex-col h-full w-full bg-white px-4 py-6">
      <div className="h-full overflow-hidden py-4">
        <div className="h-full overflow-y-auto">
          <div className="grid grid-cols-12 gap-y-2">{displayMessages()}</div>
        </div>
      </div>
    </div>
  );
};

export default MessagesPane;
Next, update src/index.js to render our Main component
import React from "react";
import ReactDOM from "react-dom";
import "./index.css";
import Main from "./components/Main";

ReactDOM.render(
  <React.Fragment>
    <Main />
  </React.Fragment>,
  document.getElementById("root")
);
Finally, modify your package.json file to fire up both your React app and your Node.js server. Replace the scripts section with the following.
  "scripts": {
    "start": "npm run development",
    "development": "NODE_ENV=development concurrently --kill-others \"npm run client\" \"npm run server\"",
    "production": "npm run build && NODE_ENV=production npm run server",
    "client": "craco start",
    "server": "nodemon -r dotenv/config --exec babel-node server/server.js",
    "build": "craco build",
    "test": "craco test",
    "eject": "react-scripts eject"
  },
Activate webhook events in your Twilio Console
If you already have webhook events turned on for new messages from a previous article, you can skip the next paragraph.
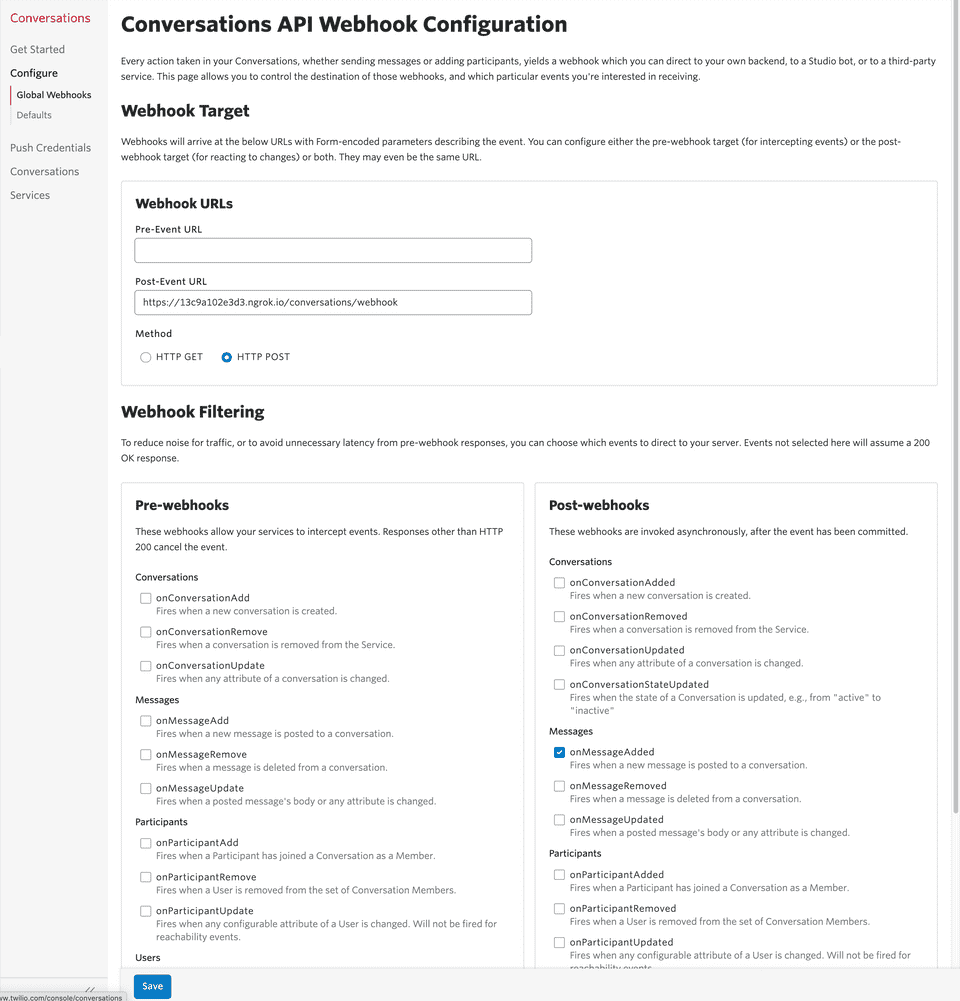
Turn on webhook events when a new message arrives in a Conversation. You would just need to turn on the “onMessageAdded” webhook under the Conversations API Webhook config panel within your Twilio Console. To tunnel messages to your local machine, you can install ngrok.
In a separate terminal window, fire up ngrok to tunnel external requests to your Node.js server listening on port 3001..
ngrok http 3001Finally, run npm start to start up your React app and your Node.js server.
npm startSend a test message from your mobile phone and you should see it appear on screen.
Interested in learning more about Twilio Conversations? Check out my upcoming eBook on Twilio Conversations and other articles.


