In this article, you will learn how to use Twilio Conversations with Twilio Studio to build a SMS Chatbot and hand off the conversation to an agent.
Buy a Twilio phone number from your Console if you don’t already have one. Once you have a Twilio number, you will need to create a Message Service. A Messaging Service is a container that holds a pool of phone numbers and applies similar behavior to all numbers. You will need to create a Messaging Service so that you can automatically put a phone number into a Twilio Conversation. Putting a phone number into a Twilio Conversation will enable texting between a sender and a representative.
Go to your Messaging Service in your Twilio Console and click the Create Messaging Service button. For now, just name your Messaging Service Conversations SMS Bot. Leave the dropdown answer as Notify my users for the Messaging Service use question. Then, click create messaging service
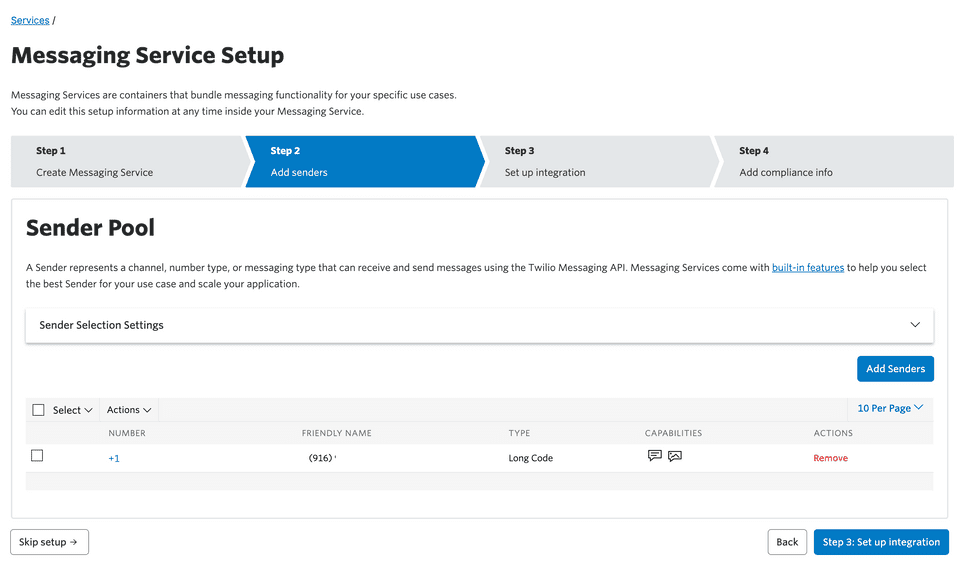
Next, associate a Twilio phone number with this service. Click Add Senders and select Phone Number as the sender type. You will then be presented with a screen to select a number
Select a number and then click Step 3: Setup integration. In this next step, select Autocreate a Conversation under Incoming Messages. This instructs Twilio to create a new Conversation for every text message received on your Twilio number, if it’s not already a part of a Conversation. As mentioned earlier, you will want to do this so that you automatically put the Chatbot and then later an agent’s phone number into Conversation.
No need to complete any registration info in the next step since you won’t be mass messaging anyone. You’re doing this just as a proof of concept.
You’ll then be prompted to either send a test message or go back to the messaging service page. You will send a test message later once everything is wired up with Twilio Studio.
Create the SMS Chatbot in Twilio Studio
Create a Studio flow that a sender will be put through when they send a text message to your Twilio number.
You will first be adding an AutoPilot widget. Navigate to Autopilot in your Twilio console and setup a simple Autopilot bot. The bot will connect the sender with a representative using the Conversations API once it recognizes one of the keyword samples you’ll train it with.
From the Autopilot page in your Twilio console, click Start from scratch. Call your bot HandOffBot when prompted and click Create bot.
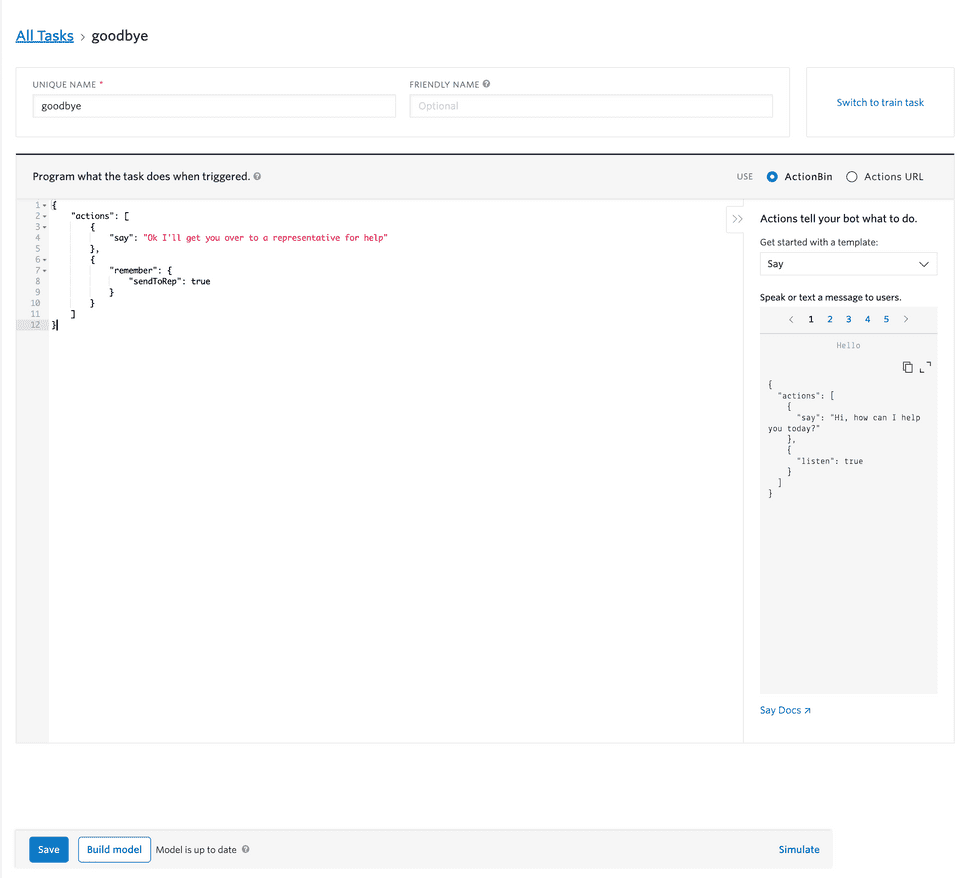
On the next screen click on the Program link corresponding to the goodbye task. Add the following JSON snippet within the task and click the Save button at the bottom.
{
  "actions": [
    {

      "say": "Ok I'll get you over to a representative for help"
    },
    {
      "remember": {
        "sendToRep": true
      }
    }
  ]
}
This task will be triggered when the sender inputs a phrase containing a keyword sample which you will train the bot with in the next step. When this task is triggered, the Autopilot bot will respond with the “Ok I’ll get you over to a representative for help”. Additionally, it will pass the memory variable sendToRep with a value of true. You will be using this variable later in the Studio flow.
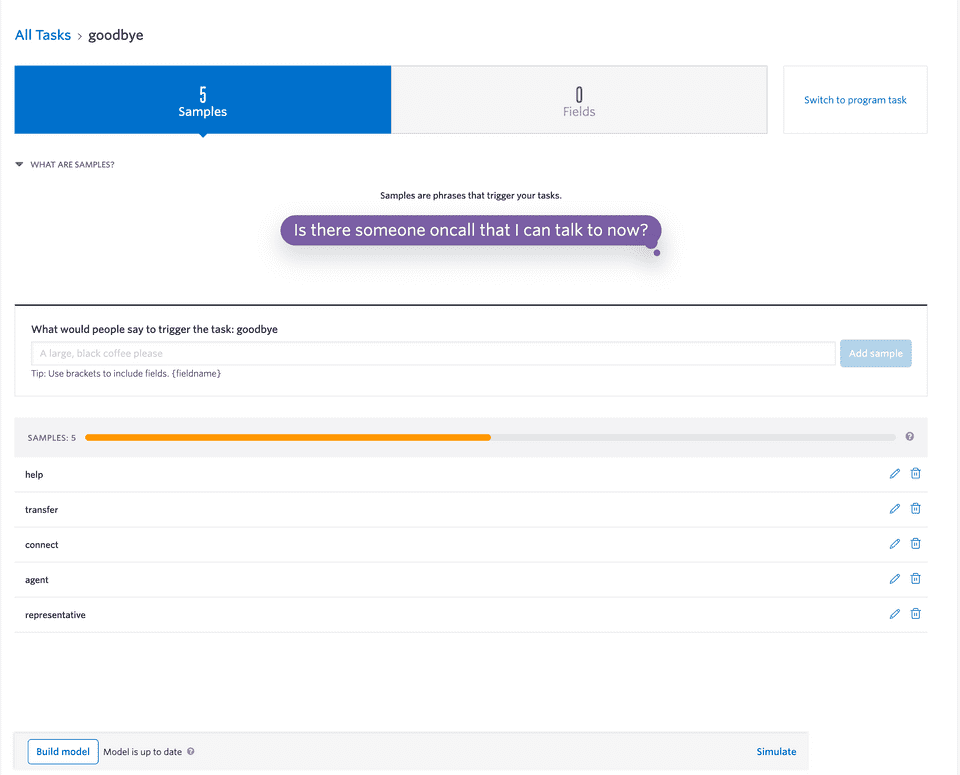
Next, you will need to program the bot to recognize certain keywords that will trigger the task you created in the last step. From this screen, click the All Tasks link to take you back to the list of tasks assigned to this bot. From the tasks screen, click on the Train button corresponding to the goodbye task.
Go ahead and delete all samples that have been prepopulated for you by Twilio. You don’t need these as you just want keywords that are similar to representative to hand off to an actual person. Go ahead and add the help, transfer, connect, agent and representative as samples. Once you’ve added those samples, you will need to update the model by clicking Build model.
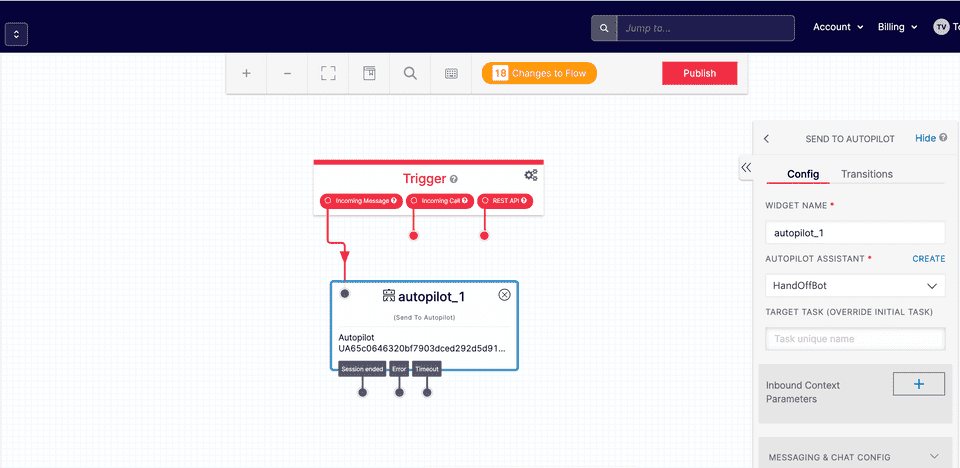
With the bot setup, create a new Studio flow with the new Autopilot bot connected to the incoming message trigger.
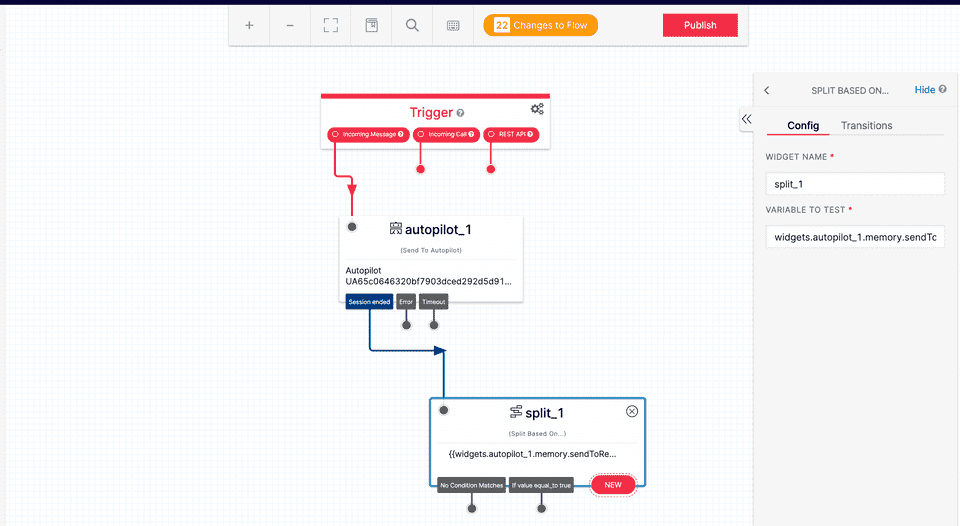
Next, add a Split Based On… widget that will send a response to the sender indicating that they are being put in touch with an actual person. You will be using the sendToRep memory variable in this widget to determine if the Studio flow should continue to the next step. Connect the Session ended transition from the Autopilot widget to the Split widget. Make sure to add widgets.autopilot_1.memory.sendToRep to the variable to test field.
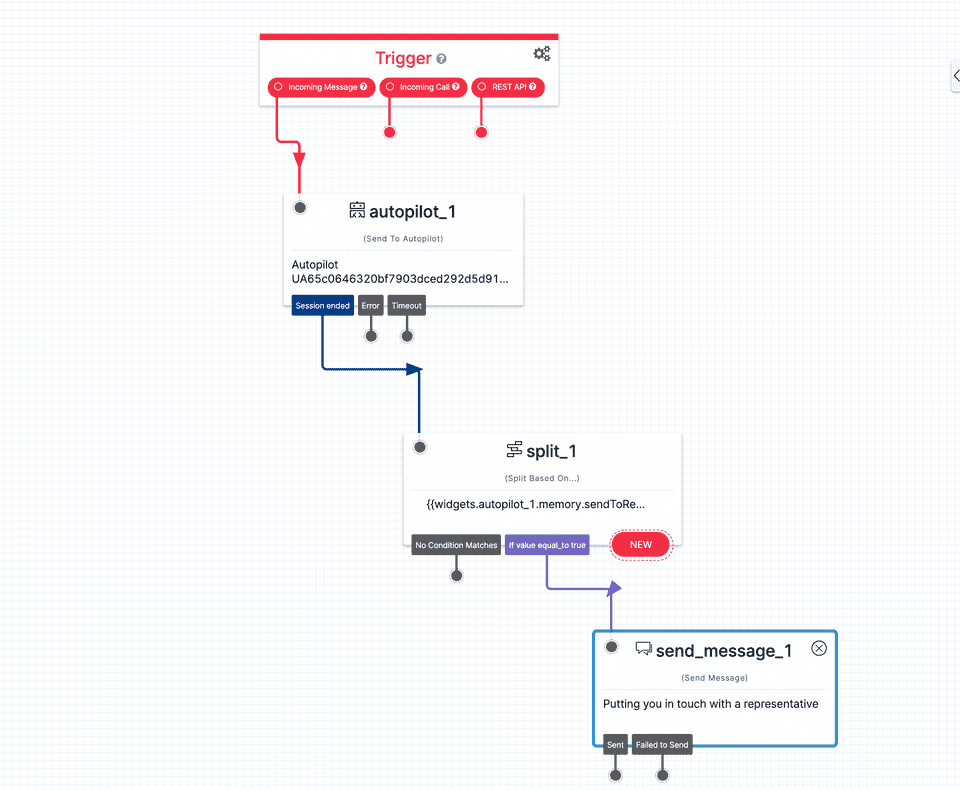
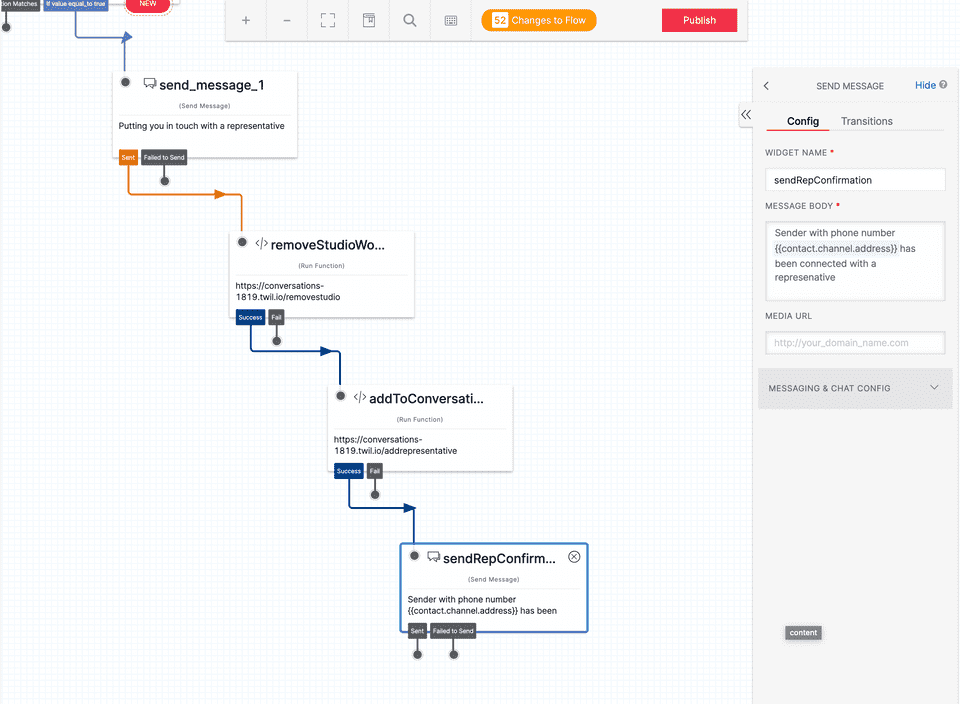
Now create a send message widget to inform the sender that we’re putting them in touch with a representative. Connect the if value equal_to true transition to this widget. You only want to let the sender know that you’re putting them in touch with a representative if they spoke one of the keywords recognized by the Autopilot bot.
Once you notify the sender that you’re putting them in touch with a representative, you need to remove the bot from the conversation and then add the representative to the conversation. You can remove the bot from the conversation by creating a function that removes the Conversation scoped webhook.
Add the below code to your own function and name the URL /removestudio
exports.handler = async function (context, event, callback) {
  const client = context.getTwilioClient();
  const conversationSid = event.ConversationSid;
  const webhookSid = event.WebhookSid;

  try {
    await client.conversations
    .conversations(conversationSid)
    .webhooks(webhookSid)
    .remove();
    const response = {
    convers
    webhookSid: webhookSid,
  };
    callback(null, response);
  } catch (error) {
    callback(error);
  }
};
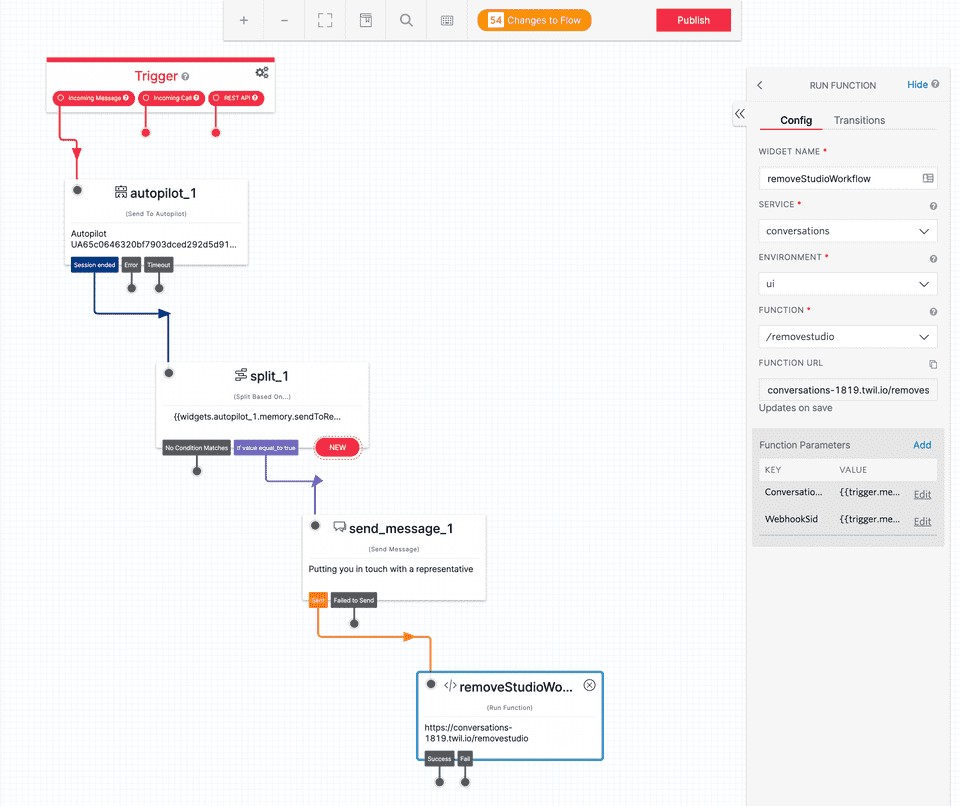
Next, add a function widget to your Studio flow to execute this function after the message about putting the sender in touch with a representative is sent. Add the following function parameters to the widget. The values assigned to these parameters are automatically populated by the Studio flow when it is invoked.
ConversationSid => {{trigger.message.ConversationSid}}
WebhookSid => {{trigger.message.WebhookSid}}
Next, create a function to run some code that will add the representative to the Conversation. Give this function the URL of /addrepresentative. This function will add run after we remove the Studio flow from the Conversation.
exports.handler = async function (context, event, callback) {
  const client = context.getTwilioClient();
  const conversationSid = event.ConversationSid;
  const repPhoneNumber = event.repPhoneNumber;

  try {
    const participant = await client.conversations
      .conversations(conversationSid)
      .participants.create({
        "messagingBinding.address": repPhoneNumber,
        "messagingBinding.proxyAddress": "YOUR_TWILIO_PHONE_NUMBER",
      });

    const response = {
      participantSid: participant.Sid,
      conversationSid: conversationSid,
    };
    callback(null);
  } catch (error) {
    callback(error);
  }
};
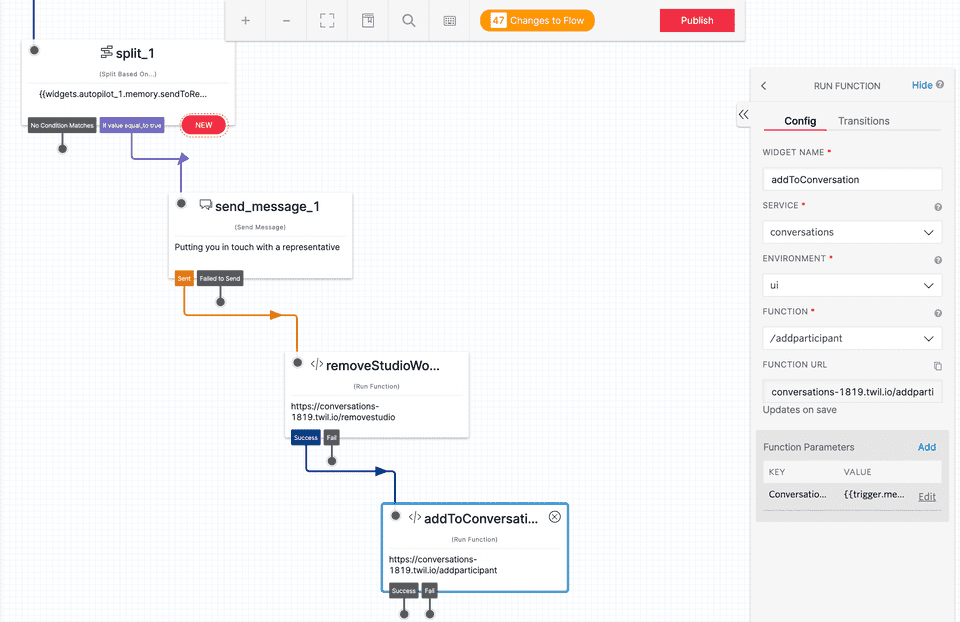
Add a function widget to your Studio flow and select the /addrepresentative function. Connect it to the function widget you just created to remove the Studio flow. Additionally, add a function parameter with the ConversationSid. Your function will be using this parameter to specify which Conversation to add the representative.
ConversationSid => {{trigger.message.ConversationSid}}Finally, send a confirmation message to inform both the sender and the representative that they’re now connected.
In summary, you created a SMS chatbot in Studio to hand off to a representative using the Twilio Conversations API, Twilio Functions, and Twilio Autopilot. The Conversations API lets you add a Studio flow that can connect a new sender texting in to a Twilio number to a Autopilot bot. Once the Autopilot bot and the sender are in a conversation, you used the Conversations API to add a representative.

